Learn how to write C++ code on Windows with this detailed guide. From setup to running your first program, this step-by-step tutorial is perfect for beginners.

C++ is a powerful and widely used programming language, especially known for its performance and flexibility. If you’re a beginner looking to learn how to write C++ code on a Windows computer, this detailed guide will help you get started. We will walk you through every step, from setting up your development environment to writing and running your first C++ program. By the end of this guide, you’ll have a solid understanding of how to work with C++ on Windows.
Step-by-Step Guide to Writing C++ Code on Windows
1. Setting Up Your Development Environment
Before you can start coding in C++, you need to set up your development environment on Windows. This involves installing a C++ compiler and a text editor or Integrated Development Environment (IDE).
a. Install a C++ Compiler
A compiler is essential for converting your C++ code into an executable program. The most commonly used compiler for Windows is MinGW (Minimalist GNU for Windows).
Steps to Install MinGW:
- Visit the MinGW website and download the latest installer.
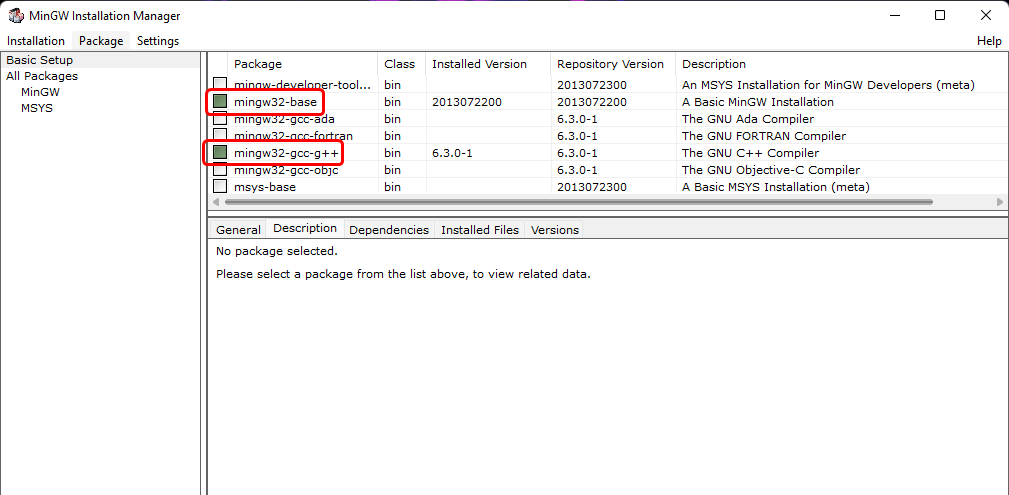
- Run the installer and choose the components you need. Make sure to
select the "gcc-g++" component, which includes the C++ compiler.

- Follow the on-screen instructions to complete the installation.
- After installation, add MinGW to your system's PATH environment variable. This can be done by navigating to "System Properties" > "Environment Variables" and editing the "Path" variable to include the path to your MinGW bin folder.
b. Install a Text Editor or IDE
A text editor or IDE is where you will write your C++ code. Visual Studio Code (VS Code) is a popular choice because it’s free, lightweight, and supports many programming languages, including C++.
Steps to Install VS Code:
- Go to the Visual Studio Code website and download the installer for Windows.
- Run the installer and follow the installation instructions.
- Once installed, open VS Code and install the C/C++ extension from the Extensions Marketplace. This will provide features like code completion, debugging, and syntax highlighting.
2. Writing Your First C++ Program
Now that your environment is set up, it’s time to write your first C++ program.
a. Create a New C++ File
- Open VS Code and create a new file. Save it with a
.cppextension, for example,firstprogram.cpp. - Type the following code into the file:
#include <iostream>
using namespace std;

int main() {
    cout << "Hello, World!" << endl;
    return 0;
}
b. Understanding the Code
#include <iostream>: This line tells the compiler to include the Input/Output stream library, which is necessary for usingcout.using namespace std;: This allows you to use the standard C++ library without typingstd::before each command.int main() {...}: This is the main function where the program starts execution.cout << "Hello, World!" << endl;: This line prints "Hello, World!" to the console.
3. Compiling and Running Your C++ Program
After writing the code, the next step is to compile and run your program.
a. Open Command Prompt
- Open the command prompt by typing
cmdin the Windows search bar and hitting Enter. - Navigate to the folder where your C++ file is saved using the
cdcommand. For example, if your file is inC:\C++Projects, typecd C:\C++Projectsand press Enter.
b. Compile Your Program
- In the command prompt, type the following command to compile your
program:
g++ firstprogram.cpp -o firstprogram
- This command tells the compiler (g++) to compile
firstprogram.cppand create an executable file namedfirstprogram.
c. Run Your Program
- After compiling, you can run your program by typing:
firstprogram
- You should see "Hello, World!" printed on the screen, which means your C++ program is working correctly.
4. Handling Errors and Debugging
Debugging is a crucial part of programming. If you encounter errors while compiling or running your program, don’t worry. Here are some common troubleshooting tips:
- Syntax Errors: Double-check your code for any typos or missing semicolons.
- File Not Found: Make sure you are in the correct
directory where your
.cppfile is saved. - Compiler Errors: Read the error messages carefully, as they often point to the exact line where the problem is.
5. Exploring More C++ Features
Once you’ve successfully run your first C++ program, you can start exploring more advanced features of C++. These include:
- Variables and Data Types: Learn how to declare variables and use different data types like int, float, and string.
- Control Structures: Understand how to use if-else statements, loops, and switch cases to control the flow of your program.
- Functions: Learn how to write reusable blocks of code using functions.
- Object-Oriented Programming (OOP): Discover the power of C++ by learning about classes, objects, inheritance, and polymorphism.
There are plenty of online tutorials and resources that can help you dive deeper into these topics.
Conclusion
Learning how to write C++ code on Windows is a valuable skill that opens up many opportunities in software development. By following this detailed guide, you’ve learned how to set up your development environment, write your first C++ program, and run it on your Windows computer. With practice and exploration of more C++ features, you’ll be able to create more complex programs and enhance your coding skills.
That’s a wrap!
I hope you enjoyed this article
Did you like it? Let me know in the comments below 🔥 and you can support me by buying me a coffee.
And don’t forget to sign up to our email newsletter so you can get useful content like this sent right to your inbox!
Thanks!
Faraz 😊


