Learn how to write code in C programming on Windows with this simple step-by-step guide. Perfect for beginners to start coding in C.

C programming is a popular language used in many applications, from operating systems to games. If you're new to coding, starting with C on Windows is a great choice. This guide will walk you through the steps to write your first C program on Windows, from setting up your environment to running your code. Let’s get started!
Step 1: Install a C Compiler
To write and run C code on Windows, you first need a C compiler. A compiler turns your C code into an executable program. One of the most popular free compilers is MinGW.
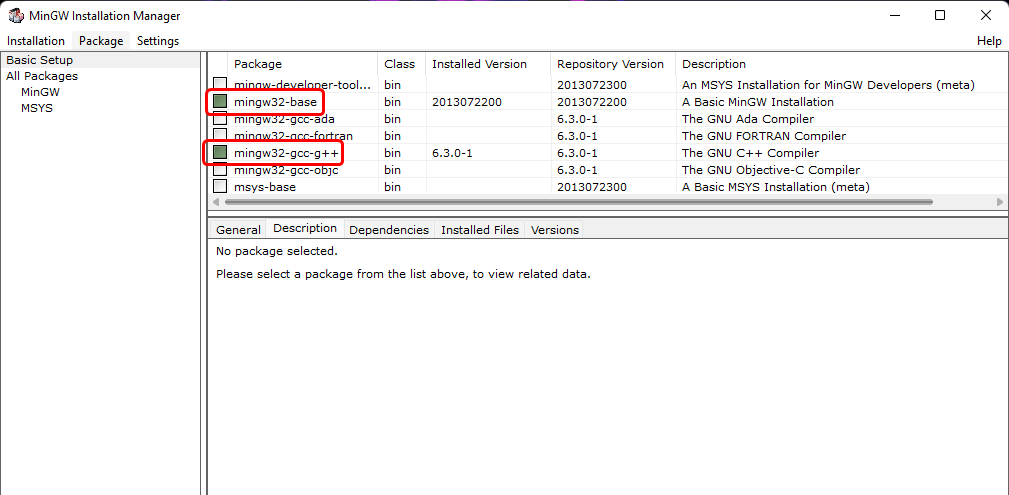
- Download MinGW: Go to the MinGW website and download the installer.
- Install MinGW: Run the installer and select the packages for the C compiler and development tools.

- Set Environment Path: After installation, add MinGW to your system’s PATH so you can run it from the command line. This can be done by:
- Right-click on This PC or Computer and select Properties.
- Click Advanced system settings > Environment Variables.
- Under System variables, find the Path variable, select it, and click Edit.
- Add the path to MinGW's
binfolder (e.g.,C:\MinGW\bin). - Click OK to save changes.
Step 2: Install a Code Editor
While you can write C code in any text editor, it's easier to use a code editor designed for programming. Visual Studio Code (VS Code) is a great option and is free to use.
- Download Visual Studio Code: Go to the VS Code website and download the installer for Windows.
- Install Visual Studio Code: Run the installer and follow the setup instructions.
- Install C/C++ Extension: Open VS Code and go to the Extensions view by clicking on the square icon on the sidebar. Search for “C/C++” and install the official extension by Microsoft.
Step 3: Write Your First C Program
Now that you have a compiler and editor set up, you can write your first C program.
- Create a New File: Open VS Code and create a new file by clicking File > New File. Save it with a
.cextension (e.g.,hello.c). - Write the Code: Type the following simple C program into the file:
#include
This code includes the standard input/output library, defines theint main() { printf("Hello, World!\n"); return 0; } mainfunction, and prints "Hello, World" to the screen.
Step 4: Compile the C Program
Once you've written your code, you need to compile it into an executable program.
- Open Command Prompt: Open the Command Prompt by pressing
Win + R, typingcmd, and hitting Enter. - Navigate to Your Code: Use the
cdcommand to navigate to the folder where you saved your.cfile.cd path\to\your\file
- Compile the Code: Run the following command to compile your code:
gcc hello.c -o hello.exe
This command tells the GCC compiler to compilehello.cand output the result ashello.exe.
Step 5: Run the Compiled Program
After compiling, you can run your program to see the result.
- Run the Program: In the same Command Prompt window, type:
hello.exe
- See the Output: If everything is set up correctly, you should see the output "Hello, World!" displayed in the Command Prompt.
Conclusion
Congratulations! You've successfully written, compiled, and run your first C program on Windows. This is just the beginning of your journey into C programming. As you continue learning, you'll be able to create more complex programs and understand deeper concepts. Remember, practice makes perfect, so keep coding and experimenting with new ideas.
That’s a wrap!
I hope you enjoyed this article
Did you like it? Let me know in the comments below 🔥 and you can support me by buying me a coffee.
And don’t forget to sign up to our email newsletter so you can get useful content like this sent right to your inbox!
Thanks!
Faraz 😊Tags: how to write code in c programming on windows, c programming tutorial for windows, step-by-step guide to c programming on windows, c programming code examples for beginners, c programming setup on windows, first c program, c programming, write c code, windows coding, c tutorial, c programming guideEnd of the article
Subscribe to my Newsletter
Get the latest posts delivered right to your inbox
Latest Post
- Set Environment Path: After installation, add MinGW to your system’s PATH so you can run it from the command line. This can be done by:
Please allow ads on our site🥺


