Learn how to install and use Apache Solr with this simple guide. Follow easy steps to set up Solr and use it for fast search indexing.


Table of Contents
- Introduction
- Understanding Apache Solr
- Pre-requisites for Installing Apache Solr
- Step-by-Step Guide to Installing Apache Solr
- Configuring Apache Solr
- Indexing Data in Solr
- How to Use Apache Solr
- Additional Features of Apache Solr
- Conclusion
Introduction
Apache Solr is an open-source search platform built on Apache Lucene. It’s widely used for building search engines that offer quick and powerful results. If you’re handling large volumes of data and need fast indexing, Apache Solr is a great choice.
In this blog, we’ll walk you through the simple steps to install Solr and how you can use it for your search projects. By the end of this guide, you’ll have a working Solr installation and understand its basic usage.
Understanding Apache Solr
Before we dive into installation, let’s take a closer look at what Apache Solr is and why it’s important.
Overview of Apache Solr
Apache Solr is designed for handling search queries efficiently, especially for websites and applications. It’s highly scalable, supports multiple languages, and provides powerful full-text search capabilities. Solr is known for its ease of use, flexibility, and ability to handle massive amounts of data.
Key Features of Solr
Some of the main features include:
- Full-text search capabilities
- Faceted search, sorting, and filtering
- Indexing and searching data in various formats like XML, JSON, and CSV
- Auto-suggestions and spell checking
- Geospatial search and data clustering
Use Cases
Solr is commonly used for:
- E-commerce platforms for searching product catalogs
- Big data analytics tools for real-time data search
- Websites and enterprise applications needing efficient document search.
Pre-requisites for Installing Apache Solr
Before installing Solr, ensure that your system meets the following requirements:
Supported Operating Systems
- Windows
- Linux/Ubuntu
- macOS
Hardware and Software Requirements
- Minimum 2GB RAM (4GB+ recommended for larger indexes)
- At least 1 CPU core (multi-core preferred for faster performance)
- Java 8 or newer (Java Runtime Environment)
Dependencies
- Apache Solr requires Java to be installed on your machine. Ensure Java is properly configured before you proceed with Solr installation.
Step-by-Step Guide to Installing Apache Solr
Here’s how you can install Apache Solr on your system:
Step 1: Install Java
Apache Solr requires Java, so make sure you have Java JDK installed.
- Download the latest version from the Oracle website.
- Install Java JDK following the on-screen instructions.
- After installation, set the
JAVA_HOMEenvironment variable:- Go to Control Panel → System and Security → System → Advanced System Settings.
- Click Environment Variables.
- Under System variables, click New and add:
- Variable name:
JAVA_HOME - Variable value:
C:\Program Files\Java\jdk_version(replace with your Java installation path).
- Variable name:
- Click OK.
You can check your Java version by running:
java -version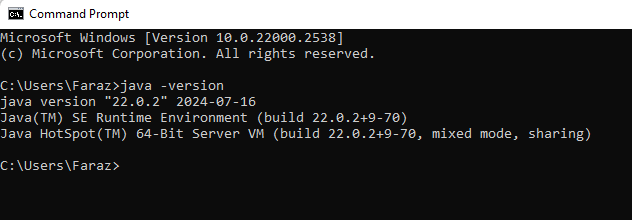
Step 2: Download Apache Solr
Visit the Apache Solr website and download the latest version. Solr comes as a compressed file. You’ll need to extract it before you can use it.
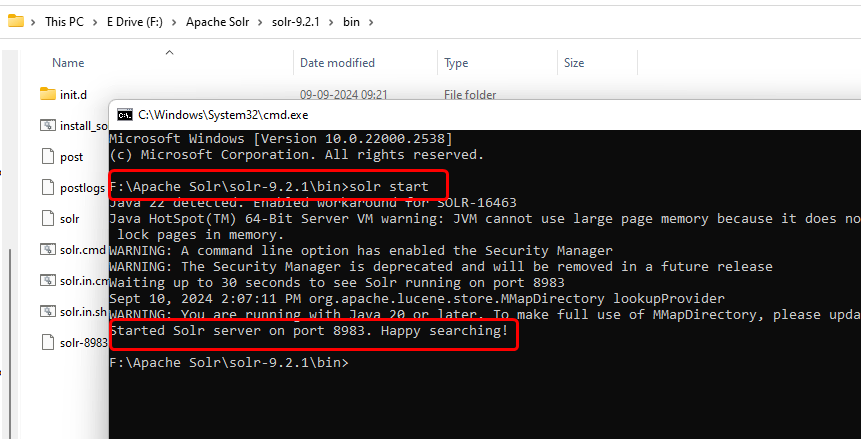
Step 3: Extract and Run Apache Solr
- Once the download is complete, extract the zip file to a folder of your choice (e.g.,
C:\solr). - Open the Command Prompt and navigate to the Solr folder:
(replacecd C:\solr\solr-x.x.x\binx.x.xwith your Solr version number). - Run the following command to start Solr:
solr start - Solr will start and you can access it at:
http://localhost:8983/solr
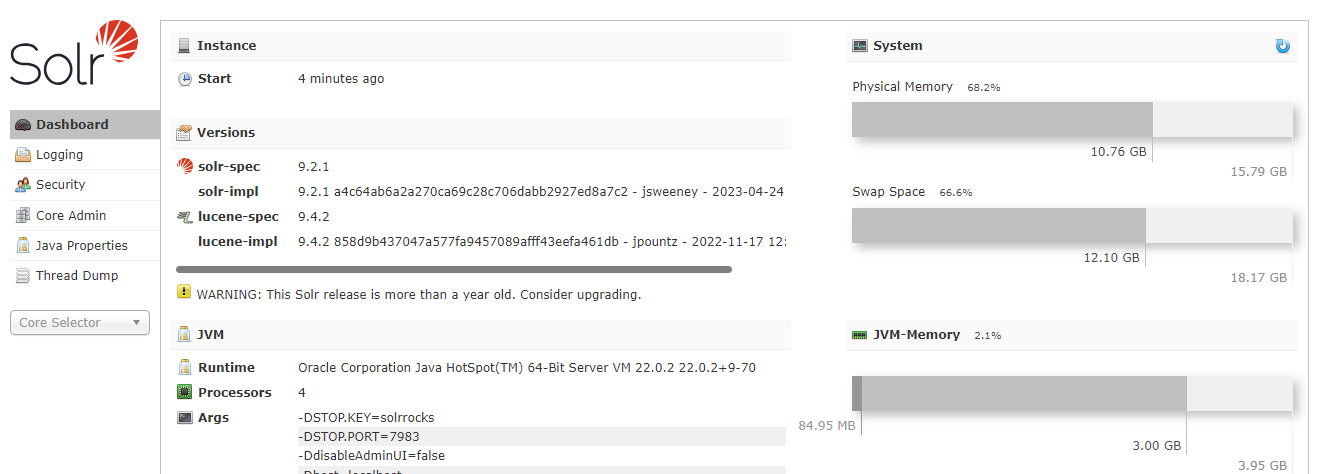
Step 4: Verify Solr Installation
Open a browser and go to http://localhost:8983/solr. You should see the Solr Admin UI.
Optional: Stop Solr
To stop Solr, run the following command:
solr stop Now, you’ve successfully installed and started Apache Solr on Windows.
Configuring Apache Solr
Setting Up a Solr Core
A Solr core is a running instance that handles its own index and configuration.
- Navigate to the Solr directory:
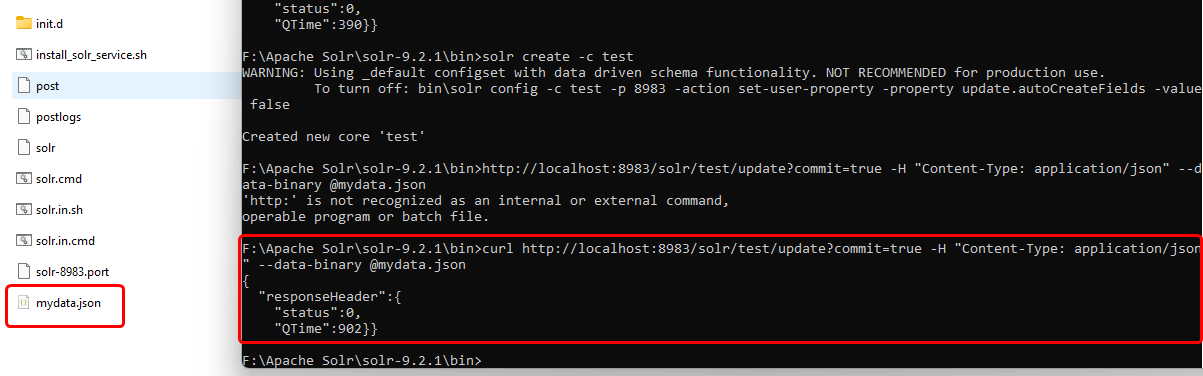
(replacecd C:\solr\solr-x.x.x\binx.x.xwith your Solr version). - Create a core (e.g., "mycore") with this command:
You can replacesolr create -c mycoremycorewith any name you want for your core. - The core will be available at
http://localhost:8983/solr/#/~cores/mycore.

Indexing Data in Solr
Indexing refers to the process of adding data to Solr so it can be searched. Solr allows you to index data in formats like JSON, XML, and CSV.
Here's how you can index data into Apache Solr using a JSON file:
Step 1: Create a JSON File
Create a new file named mydata.json and add the following data to it:
[
  {
    "id": "1",
    "title": "Introduction to Apache Solr",
    "description": "This is a beginner's guide to understanding and using Apache Solr for search applications."
  },
  {
    "id": "2",
    "title": "Advanced Solr Features",
    "description": "A detailed look at advanced features like faceting, boosting, and distributed search in Solr."
  },
  {
    "id": "3",
    "title": "Setting Up Solr in PHP",
    "description": "This article covers how to set up Apache Solr and integrate it with PHP for building search engines."
  },
  {
    "id": "4",
    "title": "Solr vs Elasticsearch",
    "description": "A comparison between Solr and Elasticsearch, two popular search platforms used in modern web applications."
  }
]
Step 2: Place the JSON File in the Solr bin Folder
Move or copy the mydata.json file into the bin folder of your Solr installation directory. For example, the path could look something like this:
/solr-x.x.x/bin/mydata.jsonStep 3: Index Data into Solr
Open the command line (CMD or terminal) and navigate to the Solr bin folder:
cd /path/to/solr-x.x.x/binNow, run the following curl command to index your JSON data into Solr:
curl http://localhost:8983/solr/test/update?commit=true -H "Content-Type: application/json" --data-binary @mydata.jsonIn this command:
http://localhost:8983/solr/test/update?commit=trueis the Solr update endpoint.--data-binary @mydata.jsonspecifies that the JSON file is being uploaded.
If the indexing is successful, you'll receive a response indicating that the data has been committed.
Step 4: Search for the Indexed Data
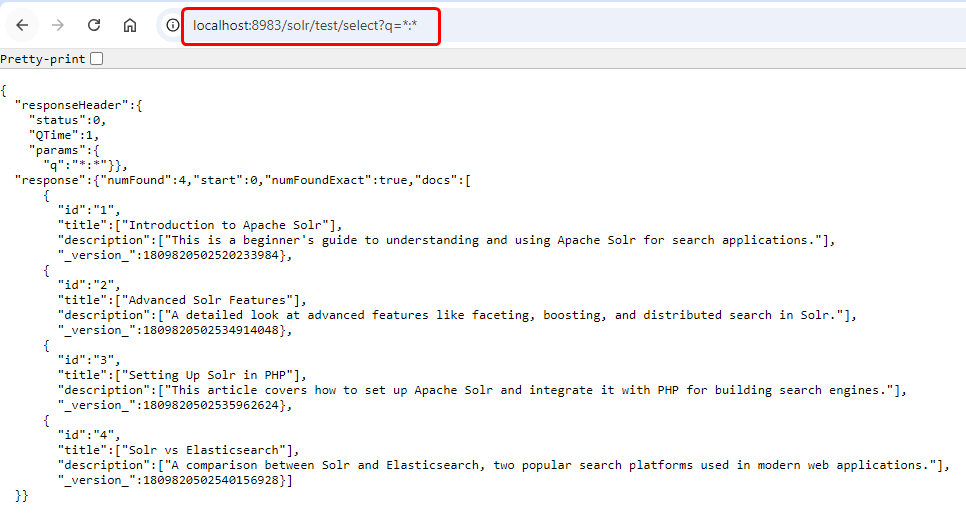
To see the indexed data, open your browser or use the command line and visit this Solr search endpoint:
http://localhost:8983/solr/test/select?q=*:*This query will return all the documents that you have indexed into Solr.
You should now see the four documents you added in mydata.json displayed in the search results.
How to Use Apache Solr
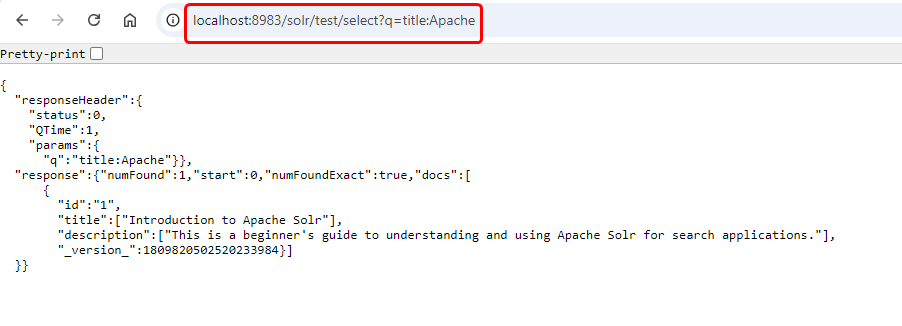
Once your data is indexed, you can start performing search queries. Here’s an example of how to search for a document that contains the word “Apache” in Solr:
http://localhost:8983/solr/test/select?q=title:ApacheYou’ll get a list of search results in the form of JSON, XML, or other formats that Solr supports.
Additional Features of Apache Solr
Solr offers a variety of advanced features to enhance your search capabilities:
- Faceted Search: Break down your search results into categories for easier navigation.
- Real-Time Indexing: Update and query your data in real time without having to reload the index.
- Geospatial Search: Perform location-based searches using latitude and longitude.
- Spell Check and Suggestions: Provide users with spelling corrections and search suggestions.
- Highlighting: Apache Solr allows you to highlight the search terms within the results, making it easier for users to identify relevant information.
Conclusion
Apache Solr is a powerful tool for anyone needing a fast and flexible search engine. It’s easy to install, scales well with your data, and offers a wide range of features to improve search functionality. With this guide, you should now be able to install and start using Solr for your projects.
By implementing Solr, you can enhance the search capabilities of your website or application, making it more user-friendly and efficient. Start with these basic steps, and as you grow more comfortable, explore its advanced features to make the most out of Solr.
What's Next?
In the next article, we will explore how to create your own search engine using Apache Solr, PHP, and MySQL. Stay tuned!
FAQs
Q1. What is the difference between Apache Solr and Elasticsearch?
A1. While both are based on Lucene, Solr is often preferred for its advanced faceting capabilities, whereas Elasticsearch is favored for its simplicity and real-time search performance.
Q2. How can I monitor Solr’s performance?
A2. Solr provides detailed statistics through its admin dashboard, including query performance and caching metrics.
Q3. Can I use Solr for real-time search?
A3. Yes, Solr supports near real-time indexing, making it suitable for real-time search applications.
Q4. What programming languages are compatible with Solr?
A4. Solr can be used with a wide range of programming languages, including Java, Python, Ruby, and PHP.
Q5. How do I scale Solr for large enterprise-level use?
A5. SolrCloud is the recommended solution for scaling Solr across multiple servers for distributed searching and fault tolerance.

That’s a wrap!
Thank you for taking the time to read this article! I hope you found it informative and enjoyable. If you did, please consider sharing it with your friends and followers. Your support helps me continue creating content like this.
Stay updated with our latest content by signing up for our email newsletter! Be the first to know about new articles and exciting updates directly in your inbox. Don't miss out—subscribe today!
If you'd like to support my work directly, you can buy me a coffee . Your generosity is greatly appreciated and helps me keep bringing you high-quality articles.
Thanks!
Faraz 😊


")
")
")
