Learn how to convert JPG to text using Python in this step-by-step guide. Discover the best tools and libraries to extract text from images efficiently.

Everyone knows that Python is a high-level programming language that is widely used for the creation of websites, tools, or software. But did you know? It can also be used for several other purposes such as converting JPG to text with maximum accuracy. Sound weird? But that’s true.
In this blog post, we are going to discuss a step-by-step procedure for accurately extracting editable text from JPG images using Python.
Step-by-Step Procedure for Converting JPG to Text Using Python
Below are the essential steps that you need to follow to transform a JPG image into editable text using Python quickly.
1. Install Required Libraries:
First of all, you are required special Python libraries that will play a crucial role in converting JPG to text. The libraries are:
- Pillow: It is a specialized library that gives Python the capability for image processing. Image processing is basically a process in which a JPG image is transformed into digital form and different operations are performed to extract all the information from it.
- Pytesseract: This is an Optical Character Recognition library of Python. It supports all image formats like JPG, JPEG, PNG, TIFF, and many more. Pytesseract is the library that will have a pivotal role in the conversion of JPG to text.
- Open CV: This is an optional library that you can consider installing. It is responsible for enhancing input picture quality as much as possible so that maximum conversion can be achieved.
Now, the question is that, from where you can download these libraries? For this, you can visit Pypi.org. Before downloading, make sure the computer perfectly fulfills the required criteria. When it comes to installation, here the is prompt that will be used:
pip install pytesseract opencv-python pillow
2. Import the libraries:
After the installation is done, it is now time to import them into the code editor (i.e., VS Code) you are using. Without importation, these libraries will not become active, and you will not be able to perform JPG-to-text conversion.
Here is the code that can be used for library importing.
import pytesseract
from PIL import Image
import cv2  # Optional for image preprocessing
3. Perform Image Preprocessing (Optional):
This step is optional, which means you can either perform it or simply ignore it. The OpenCV also referred to as CV2 will perform multiple operations on the given JPG image to improve its overall quality for maximum accuracy.
For instance, the library will first turn the given JPG into greyscale format, so that Pytesseract can easily distinguish between its letters and words. Besides this, it will also perform noise-reduction and thresholding on the input JPG file.
To make things easier, below we have written the Python code that you can for image processing.
# Load image
img = cv2.imread('image.jpg')

# Preprocessing (example: grayscale conversion)
gray = cv2.cvtColor(img, cv2.COLOR_BGR2GRAY)

# Apply thresholding or other preprocessing techniques as needed
In the “Load image,” you have to mention the name against which the JPG image is saved on your device. It would be also great if you provide the exact path as well, for ease of location. Then the image-processing algorithms of the CV2 library will become active and get their job done.
4. Start Conversion:
Since we have used OpenCV for preprocessing the image, it will be in NumPy array format. But Pytesseract only deals with images that are in PIL format. So, what to do now?
A special function Image.fromarray() will be used here. It will quickly transform the Numpy array JPG image into PIL format, allowing you to proceed toward the extraction.
Here is the code you will need to write to start the conversion process.
# Convert image to PIL format if necessary
if not isinstance(img, Image.Image):
    img = Image.fromarray(img)

# Extract text from image
text = pytesseract.image_to_string(img)

# Print or save the extracted text
print(text)
Now, you just need to run the Python code and get the extracted from the input JPG text. That’s it! You have successfully converted JPG into text using Python.
Alternative Ways to Convert JPG to Text
Apart from Python, there are multiple quick and smart alternatives available that can be used to effortlessly transform JPG images into text.
1. Use JPG to Text Converter
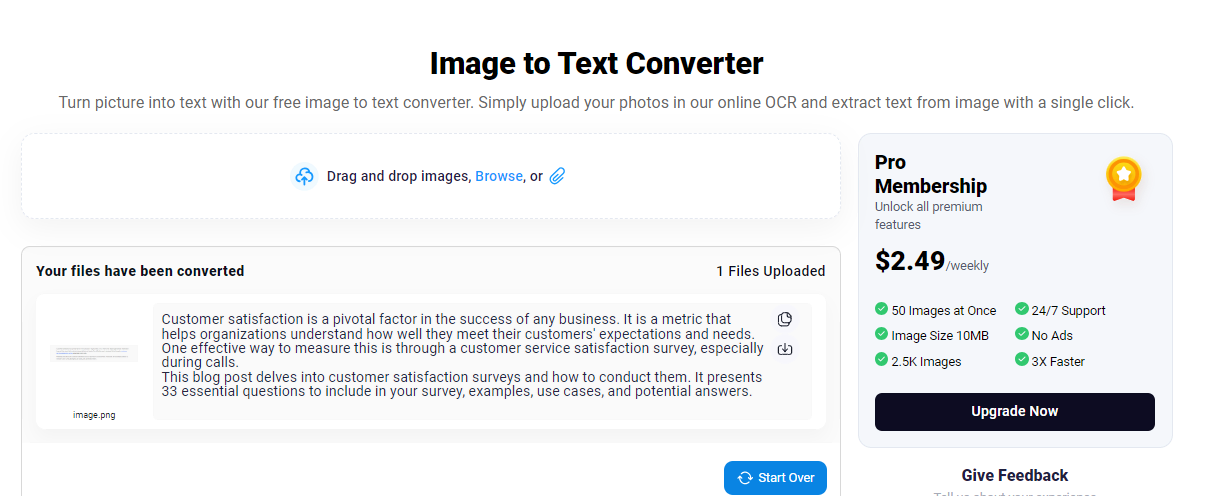
JPG-to-text converters are online tools that utilize Optical Character Recognition technology and a diverse set of intelligent algorithms to quickly and efficiently perform JPG-to-text conversion. Just like Python, they also provide extracted text in editable format for ease of editing and reviewing.
To demonstrate better, we have attached a screenshot of JPG to text converter, in which you can clearly see how the tool has extracted all the text with maximum accuracy.

2. Use Google Lens:
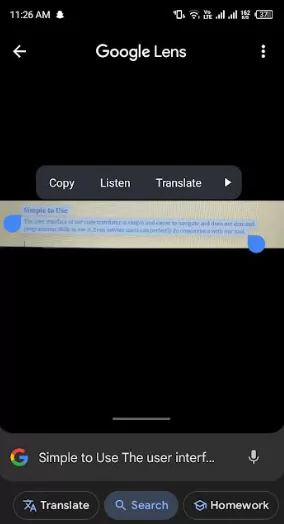
Google Lens is a special facility offered by Google Inc. Its primary purpose is to assist users in performing image searches. But let us tell you that it can also be used to extract and copy text from JPG images.
For this, you need to open Google from your phone. Click on the “Lens” icon in the search bar. Now, select and upload the required JPG picture. After uploading, Google Lens will show the “Select Text” option, click on it, and multiple options will appear including “Copy,” “Listen,” and “Translate.” We have also attached a screenshot below as a reference to all this information.

Final Thoughts:
Python is a high-level, object-oriented programming language that can be used for performing a variety of tasks quickly and efficiently. One such task is converting JPG images into text to extract useful information. In this blog post, we have explained a step-by-step procedure of how this can be done along with code examples. Besides this, we have also mentioned some quicker alternatives that you can consider taking.
That’s a wrap!
Thank you for taking the time to read this article! I hope you found it informative and enjoyable. If you did, please consider sharing it with your friends and followers. Your support helps me continue creating content like this.
Stay updated with our latest content by signing up for our email newsletter! Be the first to know about new articles and exciting updates directly in your inbox. Don't miss out—subscribe today!
If you'd like to support my work directly, you can buy me a coffee . Your generosity is greatly appreciated and helps me keep bringing you high-quality articles.
Thanks!
Faraz 😊


