Learn how to develop a bubble shooter game using HTML and JavaScript with our easy-to-follow tutorial. Perfect for beginners in game development.

Table of Contents
Welcome to our guide on creating your very own bubble shooter game using HTML and JavaScript! Bubble shooter games are renowned for their simplicity and addictive gameplay. Players aim and shoot colored bubbles to create matching groups and clear the board. In this tutorial, we'll walk you through each step, from setting up the basic structure to adding interactive features and testing your game for a seamless experience.
Whether you're a beginner looking to dip your toes into game development or an experienced coder seeking a fun project to showcase your skills, you're in the right place. Let's embark on this exciting journey together and bring your game idea to life!
Source Code
Step 1 (HTML Code):
To get started, we will first need to create a basic HTML file. In this file, we will include the main structure for our bubble shooter game.
Let's break down the code:
1. <!DOCTYPE html>: Declares the document type and version of HTML being used.
2. <html lang="en">: Defines the root element of the HTML document, specifying the language as English.
3. <head>: Contains meta-information about the HTML document, such as character encoding, viewport settings, and links to external resources like stylesheets and scripts.
<meta charset="UTF-8">: Specifies the character encoding as UTF-8, which supports a wide range of characters.<meta http-equiv="X-UA-Compatible" content="IE=edge">: Instructs Internet Explorer to use the latest rendering engine.<meta name="viewport" content="width=device-width, initial-scale=1.0">: Configures the viewport for mobile devices, ensuring proper scaling and rendering.<title>Bubble Shooter Game</title>: Sets the title of the web page.<link rel="stylesheet" href="styles.css">: Links an external stylesheet named "styles.css" to style the contents of the page.
4. <body>: Contains the visible content of the web page.
<div align='center'>: Centers the content horizontally.<canvas id="game-canvas" style='maring:0 auto; background: #eee' width="480" height="320"></canvas>: Defines a canvas element with the id "game-canvas" for drawing graphics. The canvas is set to have a background color of light gray (#eee) and dimensions of 480x320 pixels.
5. <script>: Loads JavaScript files necessary for the Bubble Shooter game to function.
- Each
<script>tag loads a JavaScript file from an external source (src attribute) hosted on rawgit.com. - The JavaScript files include functionalities for managing the game grid, balls, shooter, and overall game logic.
<script src="script.js"></script>: Loads a local JavaScript file named "script.js", which contains custom scripts for initializing and running the game.
After creating the files just paste the following codes into your file. Make sure to save your HTML document with a .html extension, so that it can be properly viewed in a web browser.
This is the basic structure of our bubble shooter game using HTML.
Step 2 (CSS Code):
No CSS
/*

 No CSS

*/
Step 3 (JavaScript Code):
Finally, we need to create a function in JavaScript.
Let's break down its components:
1. Canvas Setup:
- It retrieves the canvas element from the HTML with the ID "game-canvas".
- It gets the 2D rendering context of the canvas, which will be used for drawing shapes, text, images, etc.
- It also gets the position and size of the canvas relative to the viewport.
2. Mouse Interaction Setup:
- Event listeners are set up to track mouse movement, mouse button clicks, and touches on mobile devices.
- Mouse position is updated based on these events.
3. Game Objects:
- The code defines a set of game objects and layers to organize them.
- There are functions to add and remove objects from the game.
- Buttons are also handled as special objects with associated functions.
4. Game Initialization:
- Colors and initial settings for the game are defined.
- The setup function initializes the game scene, including creating a ball shooter, a game grid, and a game manager.
5. Drawing Functions:
- Functions to draw various shapes, including buttons with text, rounded rectangles, and filled rectangles, are defined.
- These drawing functions are used to render the game objects on the canvas.
6. Game Loop:
- A main loop is set up using setInterval, which repeatedly calls the draw function at a fixed interval (delay milliseconds).
- Within the draw function, the canvas is cleared, game objects are drawn, and mouse interactions are updated.
7. Rescaling Functionality:
- The
rescale()function ensures that the game canvas adjusts its size and position based on the window size. - It calculates the scaling factor
(sf)to maintain the aspect ratio and adjusts the canvas accordingly.
8. Button Drawing Functions:
- Custom functions
draw_button()and associated helper functions are provided to draw buttons on the canvas. - These buttons can have different states like hover and click, and they trigger specific actions when interacted with.
9. Interval Loop:
- The
setInterval()method is used to repeatedly call thedraw()function at a specified delay (delay milliseconds). - This ensures that the game is continuously updated and rendered at a consistent frame rate.
Create a JavaScript file with the name script.js and paste the given codes into your JavaScript file and make sure it's linked properly to your HTML document so that the scripts are executed on the page. Remember, you’ve to create a file with .js extension.
var canvas = document.getElementById("game-canvas");
var ctx = canvas.getContext("2d");
var rectangle = canvas.getBoundingClientRect();
var mouse = {};
var game_grid = null;

var game_width = canvas.width;
var game_height = canvas.height;
var fixed = false;

var defaultZ = canvas.style.zIndex

var initial_colors = ['red', 'blue', '#eddd2d', '#54e202']
var add_colors = ['#00d8ff', 'magenta', '#c46907']
var game_colors = initial_colors.slice(0)

mouse.x = 0;
mouse.y = 0;
mouse.down = 0;
mouse.prev_down = 0;
mouse.held = 0;

//setup mouse listener
document.addEventListener('mousemove', mouse_move, false)
canvas.addEventListener('mousedown', function(evt) {mouse.down = 1}, false)
canvas.addEventListener('mouseup', function(evt) {mouse.down = 0; click_buttons(evt)}, false)
document.addEventListener('touchmove', touch_move, false)
canvas.addEventListener('touchstart', function(evt) {mouse.down = 1; touch_move(evt)}, false)
canvas.addEventListener('touchend', function(evt) {mouse.down = 0; click_buttons(evt)}, false)

//setup rescale listener
window.onresize = function(evt) {rescale()};

var delay = 10 //delay between frames, 10 ms
//Get start time
var prev_time = new Date().getTime()

//List of all things to draw on the screen.
var game_objects = {}
var object_layers = {}
var buttons = {}
var layers = []
var added = 0
var sf = 1

//Max elapsed time per frame
var max_elapsed = 25

//call setup function
setup()

function get_color()
{
  return game_colors[Math.floor(Math.random() * game_colors.length)];
}

function touch_move(e)
{
    var touch = e.touches[0];
    rectangle = canvas.getBoundingClientRect();
    var x = touch.clientX - rectangle.left;
    var y = touch.clientY - rectangle.top;
    mouse.x = x / sf;
    mouse.y = y / sf;
}

//function to track mouse movement
function mouse_move(e)
{
    rectangle = canvas.getBoundingClientRect();
    var x = e.clientX - rectangle.left;
    var y = e.clientY - rectangle.top;
    mouse.x = x / sf;
    mouse.y = y / sf;
}

function click_buttons(evt) {
  if(mouse.down == 0 && mouse.prev_down == 1) {
    button_ids = Object.keys(buttons);
    for(var index = 0; index < button_ids.length; index++) {
      button = buttons[button_ids[index]]
      if (button.intersect(mouse.x, mouse.y)) {
        button.fn()
      }
    }
  }
}

//Adds a button to the screen
function add_button(button, layer=0)
{
  id = add_object(button, layer)
  buttons[id] = button
  return id
}

//Removes a button from the screen
function remove_button(id)
{
  console.log(id)
  if(id in buttons) {
    remove_object[id]
    delete buttons[id]
  }
}

//Adds an object and returns the object's id
function add_object(object, layer=0)
{
    game_objects[added] = object
    object.id = added
    object.layer = layer;
    //check if the layer exists, if not create it
    if (!(layer in object_layers)) {
      object_layers[layer] = {}
      layers.push(layer);
      layers.sort(function(a, b) {
          aNum = parseInt(a)
          bNum = parseInt(b);
          if (aNum == bNum)
              return 0
          if (aNum > bNum)
              return 1
          return 0
      })
    }
    //Add object to layer
    object_layers[layer][object.id] = 0
    added += 1
    return object.id
}

//Removes an object from the draw hash table
function remove_object(id)
{
    //find object layer and delete it from layer
    for (var index = 0; index < layers.length; index++) {
      layer = layers[index]
      if(id in object_layers[layer]) {
        delete object_layers[layer][id]
      }
    }
    //remove object from game_objects
    return delete game_objects[id]
}

//resets the game
function reset()
{
  game_colors = initial_colors.slice(0);
  game_manager.remove_self()
  ball_shooter.remove_self()
  game_grid.remove_self()

  //add ball shooter
  ball_shooter = new shooter(game_width / 2, game_height - 20, 10, 75, 400, get_color);
  add_object(ball_shooter, -1)
  ball_shooter.load(get_color);

  //Create game grid
  game_grid = new grid(22, 10, 1, 14, 10);
  //add game grid
  add_object(game_grid)
  //add a ball to the grid
  game_grid.add_rows(get_color, 5)

  game_manager = new manager(ball_shooter, game_grid)
  add_object(game_manager, 10)
}

//draw function
function draw()
{
    //clear canvas at start of frame
    clear();

    //get current time
    var date = new Date()
    var time = date.getTime()
    //calculate elapsed (in seconds)
    var elapsed = (time - prev_time) / 1000.0
    elapsed = Math.min(elapsed, max_elapsed)

    //iterate over the game objects and draw them all
    //start out at layer 0, then progress up
    layers.forEach( function(layer) {
      //get keys
      object_keys = Object.keys(object_layers[layer])
      for(var index = 0; index < object_keys.length; index++)
      {
          if (object_keys[index] in game_objects)
              game_objects[object_keys[index]].draw(elapsed)
      }
    })

    //update mouse
    mouse.prev_down = mouse.down
    if (mouse.down)
    {
        mouse.held += elapsed
    }
    else
    {
        mouse.held = 0
    }

    //update previous time
    prev_time = time
}

function rescale() {
  canvas.width = game_width
  canvas.height = game_height
  sf = 1
  canvas.style.zIndex = defaultZ
  canvas.style.position = 'relative'
  ctx.scale(1, 1)
  canvas.style.left = 0
  canvas.style.top = 0
  if(fixed) {
      width = window.innerWidth;
      height = window.innerHeight;
      temp_sf = Math.min(width / canvas.width, height / canvas.height)
      sf = temp_sf
      canvas.width = canvas.width * sf
      canvas.height = canvas.height * sf
      ctx.scale(sf, sf)
      canvas.style.position = 'fixed'
      canvas.style.zIndex = '999'
      canvas.style.left = window.innerWidth / 2 - canvas.width / 2
      canvas.style.top = window.innerHeight / 2 - canvas.height / 2
  }
}

//This function will clear the canvas between frames
function clear()
{
    ctx.clearRect(0, 0, game_width, game_height);
}

var ball_shooter
var game_grid
var game_manager

//setup the scene
function setup()
{
    //add ball shooter
    ball_shooter = new shooter(game_width / 2, game_height - 20, 10, 75, 400, get_color);
    add_object(ball_shooter, -1)
    ball_shooter.load(get_color);

    //Create game grid
    game_grid = new grid(22, 10, 1, 14, 10);
    //add game grid
    add_object(game_grid)
    //add a ball to the grid
    game_grid.add_rows(get_color, 5)

    game_manager = new manager(ball_shooter, game_grid)
    add_object(game_manager, 10)

    rescale()
}

function draw_button(x, y, content, gap=10, text_size=30, border_radius = 10,
    border_thickness=3, font="Comic Sans MS", fill='#eee', text_color='red',
    fill_hover='#ccc', text_hover='#ddd', fill_down='#aaa', text_down='#bbb',
    border='black', text_border='red')
{
    ctx.textAlign = "center";
    pressed = false
    ctx.font = text_size + "px " + font;
    var retry = content
    var box_width = ctx.measureText(retry).width

    if(mouse.x >= x - box_width / 2 - gap &&
        mouse.x <= x - box_width / 2 + box_width + gap &&
        mouse.y >= y && mouse.y <= y + text_size + gap)
    {
        fill = fill_hover
        text_color = text_hover
        if(mouse.down) {
            fill = fill_down
            text_color = text_down
        }
        if(mouse.prev_down && !mouse.down)
        {
            pressed = true;
        }
    }
    ctx.fillStyle = fill;
    fillRoundRect(x - box_width / 2 - gap, y,
        box_width + gap * 2, text_size + gap, border_radius)
    ctx.fillStyle = border
    roundRect(x - box_width / 2 - gap, y,
        box_width + gap * 2, text_size + gap, border_radius, border_thickness)
    ctx.fillStyle = text_color
    ctx.fillText(retry, x, y + text_size)
    ctx.fillStyle = text_border
    ctx.lineWidth = 1
    ctx.strokeText(retry, x, y + text_size)
    return pressed;
}

function fillRoundRect(x, y, w, h, radius)
{
    var r = x + w;
    var b = y + h;
    ctx.beginPath();
    ctx.lineWidth="4";
    ctx.moveTo(x+radius, y);
    ctx.lineTo(r-radius, y);
    ctx.quadraticCurveTo(r, y, r, y+radius);
    ctx.lineTo(r, y+h-radius);
    ctx.quadraticCurveTo(r, b, r-radius, b);
    ctx.lineTo(x+radius, b);
    ctx.quadraticCurveTo(x, b, x, b-radius);
    ctx.lineTo(x, y+radius);
    ctx.quadraticCurveTo(x, y, x+radius, y);
    ctx.fill();
}

function roundRect(x, y, w, h, radius, thickness=4)
{
    var r = x + w;
    var b = y + h;
    ctx.beginPath();
    ctx.lineWidth=thickness;
    ctx.moveTo(x+radius, y);
    ctx.lineTo(r-radius, y);
    ctx.quadraticCurveTo(r, y, r, y+radius);
    ctx.lineTo(r, y+h-radius);
    ctx.quadraticCurveTo(r, b, r-radius, b);
    ctx.lineTo(x+radius, b);
    ctx.quadraticCurveTo(x, b, x, b-radius);
    ctx.lineTo(x, y+radius);
    ctx.quadraticCurveTo(x, y, x+radius, y);
    ctx.stroke();
}

setInterval(draw, delay)
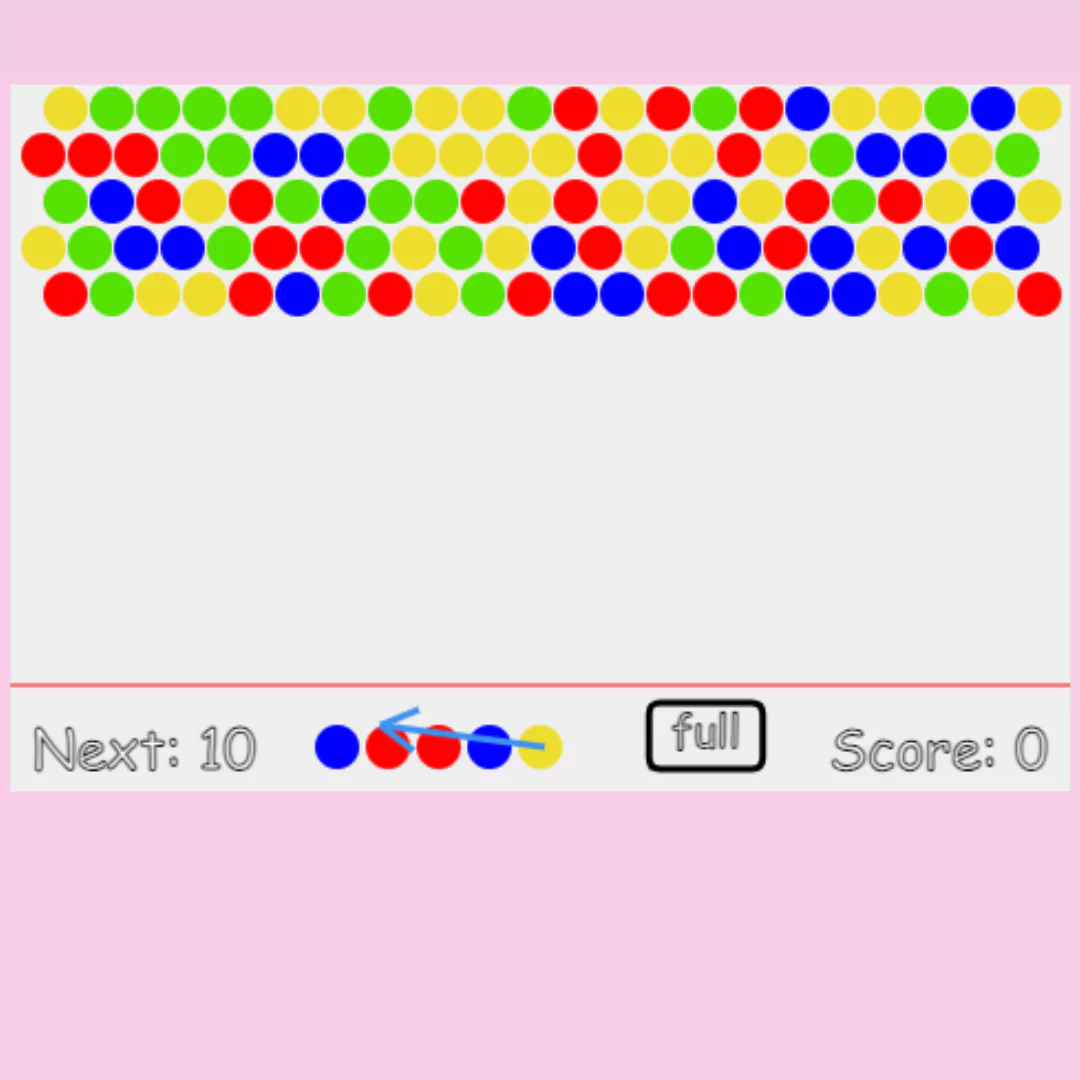
Final Output:

Conclusion:
In conclusion, you've now completed creating your very own bubble shooter game using HTML and JavaScript. From laying the foundation with HTML structure to implementing game logic and adding interactivity, you've gained valuable insights into game development.
But remember, this is just the beginning! Feel free to customize and expand upon your game, adding new features, levels, and challenges. Share your creation with friends, family, and the online community to showcase your creativity and coding prowess.
Game development is an ongoing process of learning and experimentation. So keep exploring, coding, and most importantly, having fun! We can't wait to see the amazing games you'll create in the future. Happy coding!
Code by: Nicholas Maltbie
That’s a wrap!
I hope you enjoyed this post. Now, with these examples, you can create your own amazing page.
Did you like it? Let me know in the comments below 🔥 and you can support me by buying me a coffee.
And don’t forget to sign up to our email newsletter so you can get useful content like this sent right to your inbox!
Thanks!
Faraz 😊


